 |
| Me 'n Ollie |
 |
That thingy that looks like a tiny pitchfork, or a saguaro cactus,
serves to indicate where the impression will be made. Although
it looks determined to commit suicide by type slug impact,
it nimbly jumps out of the way every time one heads its way.
An introduction to the many ingenious mechanisms of the Oliver. |
I thought my experience of the last two days, during which I was able to bring an Oliver No. 9 to life, would be interesting to those unacquainted with this fascinating machine, and would provide amusement to those who are. That I was able to accomplish this in two days instead of two months is thanks to the fact that the machine was in pretty decent condition on arrival, to helpful YouTube videos made by Martin Rice, and to a well-made reproduction of the Oliver No. 9 operation and maintenance manual obtained from eBay. Actually, Ollie would have been typing much sooner had I not laid aside and lost track of a small bit of metal found among the packing material in the shipping box that looked more like a heavy duty staple than anything that might be part of a typewriter. "My bad", as we say these days.
But let's start at the beginning.
 |
| Compressed air took care of the dust bunnies |
A quick tour
 |
| The fascinating ribbon vibrator |
 |
| The carriage is easily removable and replaceable. The small knob is actually a pushbutton that releases the carriage. |
.
 |
| Two of the four bearings, more like railcar wheels, that the carriage rides on are in this photo. One is at upper left, the other lower center. |
.
 |
| Here we are looking at the bottom of the carriage. In the center is the slot that the draw string hooks on to. More about that later. |
.
 |
| The spring drum that provides the force to pull the carriage along its tracks. The former user had attempted to get it going with a hemp drawstring. But to no avail, as something was awry with the spring. Here i am beginning to disassemble the drum to see what's up. I soon learn that the rear carriage track must first be removed to get the drum off. |
.
 |
| Aha - the inside end of the spring that should be anchored by slipping over a slot in the spindle has broken off. An easy fix. |
.
 |
| And when the spring drum is back together, this screw can fine-tune the tension. |
.
 |
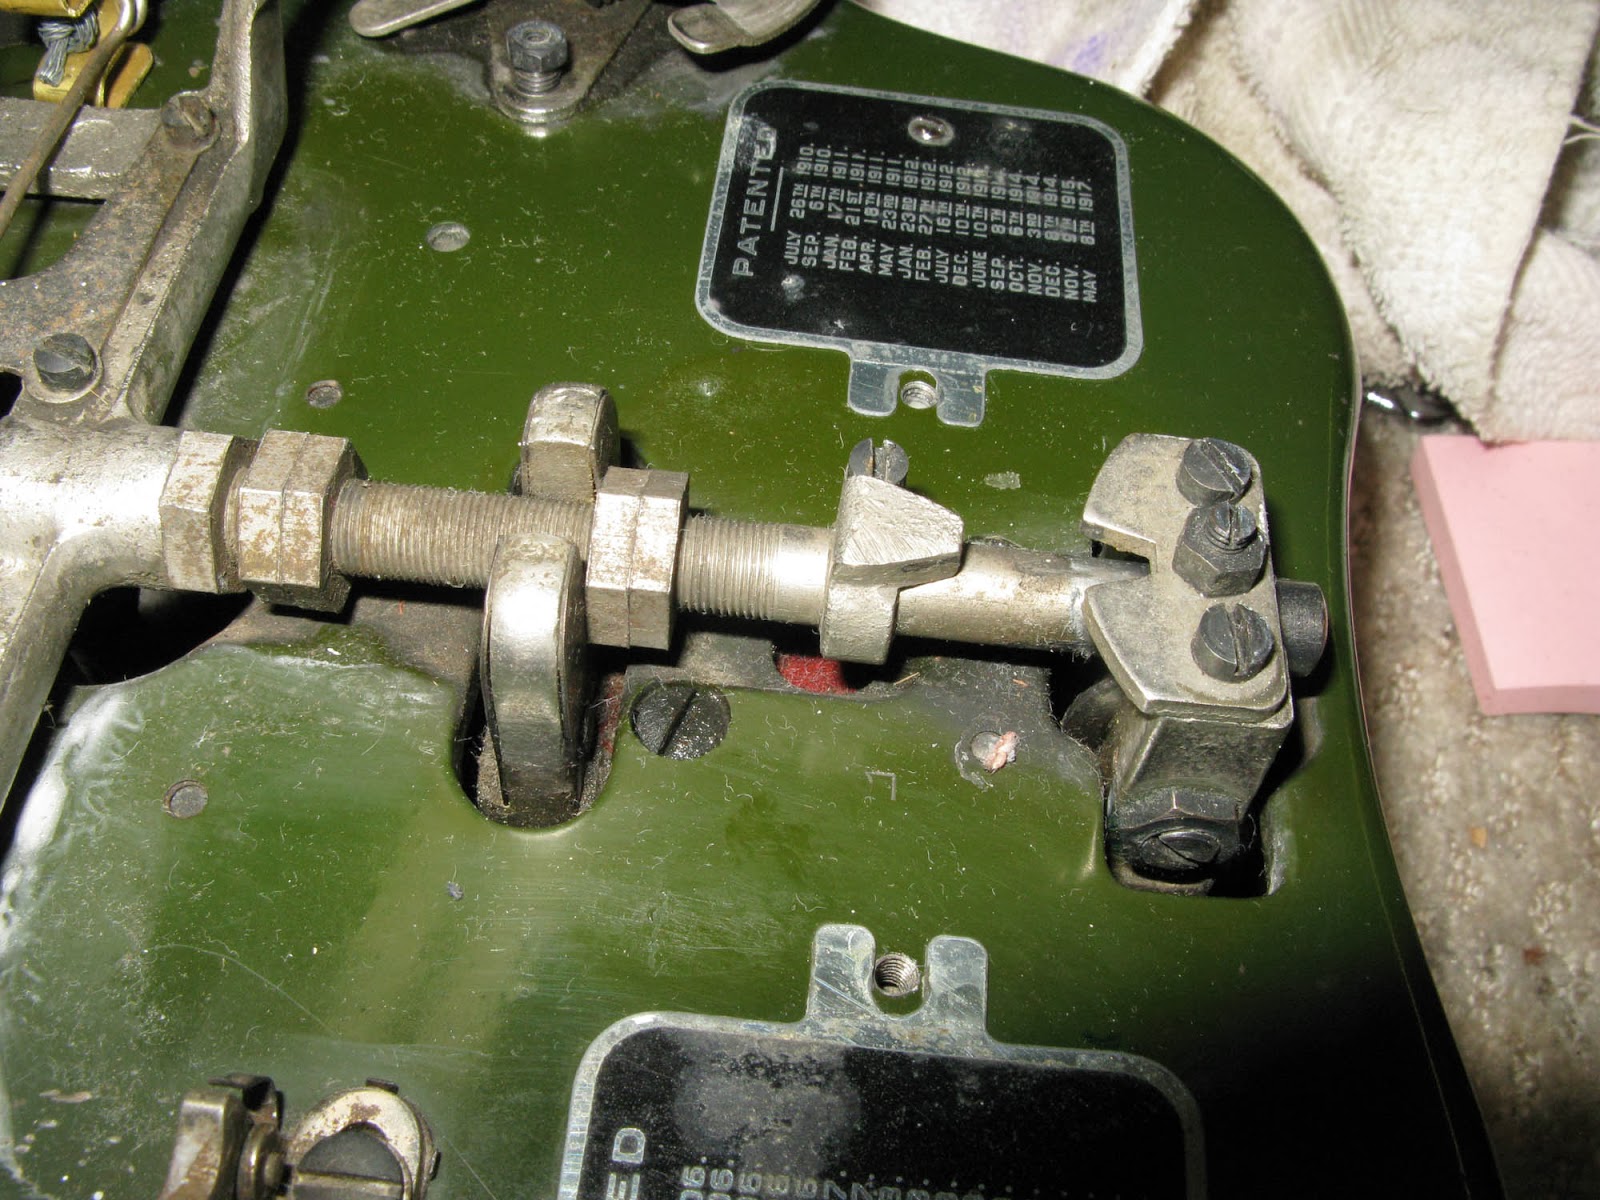
| OK - here's where we get into the ingenious mechanism that allows the carriage to be removed without an issue with the drawstring. Remember that "staple" I set aside and lost? That is the hook on the end of the draw cord. It is captured and held by that fork as the carriage is removed. A part "sine qua non". |
.
 |
| Not finding the draw cord hook i fashioned one from some brass stock. |
.
 |
| Here's my draw cord hook in its place on the end of the carriage. |
.
 |
| And here it is, captured by that fork as the carriage was removed by sliding it to the right in this view. I use picture-hanging cable as a draw cord. See that pigtail the cable passes through? A kind thought by the designers that would capture the cord keeping it from flying around should things go wrong and the hook get unseated from that fork while the carriage is off. When the carriage is replaced, the tab on the top of the hook slides into its place on the end of the carriage and you are good to go. Ingenious! |
.
 |
| The odd bump on the rear of the machine houses the stops for the CAP and FIG positions. |
.
 |
| Here it is in neutral, i.e., lowercase, position. |
.
 |
| CAPs position |
.
 |
| FIG position. Amazingly solid. As is the rest of the machine. But the basic design limited typing speed, and was doomed. |
.


That's brilliant! I think your post will finally push me to work on my Oliver no.9 which has the drawstring on the loose (what else is there to fix will probably come up along the way). Thank you very much!
ReplyDeleteGood job creating a new hook! That is really a clever design.
ReplyDeleteAbout a month ago, I purchased an otherwise very clean Oliver #9 with a broken draw cord. This post and the ingenious idea of using frame hanging wire (of which I have an abundance, for some reason) will provide the impetus I need to get my machine back into action. Thanks!!
ReplyDeleteWow! I'm really glad to hear that my hasty post last night, made in the excitement of seeing this Oliver actually typing, has been helpful. If you don't have one, I strongly suggest that you purchase the very thorough operation and maintenance manual available from eBay seller "oliverservices". Do a search for "oliver typewriter manual". It is well made and clearly printed on heavy cardstock paper, and includes detailed maintenance information, including a page full of lubrication points. The idea of making that draw string hook came from the entertaining and informative YouTube videos that you will find with a search for "martin rice oliver". When I am fully awake and functional this morning I'll post a bit of a typecast from Ollie - he is great fun to type with, once I get used to the fumes of penetrating oil which I liberally doused him with last night. At least Ollie breathed a sigh of relief after that treatment.
ReplyDeleteThis is a very fantastic machine! Hats off to you, sir, that is a very nicely made replacement part.
ReplyDeletenice repair work and fascinating and well thought out mechanisms (:
ReplyDeleteslick! I will have to pick your brain a bit about linefeed.
ReplyDeleteI think my collection will always feel incomplete without an Oliver. And now you have re-whetted my appetite. The blow-by-blow account and your references will come in really useful once one eventually lands in Typewriter Heaven.
ReplyDeleteTony, I just noticed that my Oliver 5, "La Generala", is also lacking this ingenious hook. On it the drawband is tied directly to the carriage, so it has to be untied in order to retire the assembly. Now that I finally discovered how easy it is to remove the carriage, and am planning to give my Oliver a bit more TLC, I'll try my hand at creating my own drawstring hook using your instructions.
ReplyDeleteThank you very much!
This comment has been removed by the author.
ReplyDeleteMiguel, be sure to watch Martin Rice's You Tube videos. He demonstrates how he made a carriage hook from a brass picture hanger. That was what inspired me to try to make one.
ReplyDeleteTony, thanks to you I have been able to get a recently purchased Olympia model 8 working once again. The carriage was loose and unresponsive but after reading through your article and with the images you provided I was able to sort the carriage out and it is now working perfectly, Thank you very much for all your help.
ReplyDeleteBy the way, I may just send you a letter if your address is still the same as is posted on your profile!
DeleteGreat post. Nice work. I do not know how I missed it. I was searching for information on the one I recently received.
ReplyDeleteGreat post - I am so glad that I found it. I recently purchased an Oliver No. 9 in pretty good condition, but it has a few issues. Your solution to the missing draw cord hook is great and I will use it. I hope that my mainspring problem is as simple to fix as yours (it won't hold tension and I have yet to open the drum).
ReplyDeleteI will be referring to your post often as I gently rehabilitate my Oliver.